
Yoga to improve breathing
Yoga is a technique dating back thousands of years. Its principles are based on creating harmony between the mind, body and spirit. Regularly practicing yoga can help to relieve and fight colds, flu, bronchitis and other respiratory ailments because the exercises lay on teaching you to relax and to breath better.

+ Yoga originated in India and dates back more than 5,000 years. Yoga is considered a philosophy, science, art and therapy that aims to attain the unity of mind, body and spirit through the teaching of body postures, breathing, relaxation, concentration and meditation.
The word “yoga” means to unite or to join together our potential to reach a balance between our spiritual, mental and physical state. The discipline aims to develop our mental awareness and to identify the energy that flows inside of our bodies and the Universe using this force to improve our stamina and health, to awaken our spirit and to connect our bodies to the Universe's energy.
Each yoga pose (also known as asana) is thought to improve your body's functions -brain, cells, muscles, glands, organs, nerves and tissues- while at the same time increasing your clarity and mental concentration. The poses also prepare the body and mind for meditation, a state that brings serenity and union between the body, the mind and the spirit and the Universe.
HOW TO GET READY
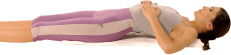
Before practicing yoga postures or asanas, you should prepare your body through a series of stretching exercises to warm up your muscles and to release tension. It's best to do these poses on a padded mat or carpeted floor, which will help you to feel more comfortable and confident, and prevent you from hitting your body on a hard surfaced floor.
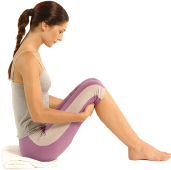
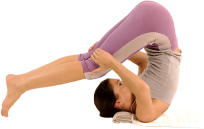
Rocking chair
This pose, called the Rocking chair or Hammock, is good for loosening and toning your muscles.
1. Sit on the floor, with your chin pressed against your chest. Bend your legs, with your feet on the floor and your hands behind your thighs.
2. Bring your torso backward to the floor, lifting your legs up and supporting them with your arms to continue to bring your legs back.
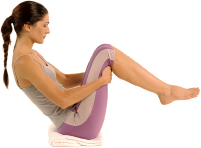
3. With the same motion, bring your legs back until they touch the floor. Next, bring them up, taking care not to lift up your chin. Continue the exercise, bringing your legs back and then forward at least 7 times continuously, without taking a rest between the sets.
A SMART TIP
When you first begin these exercises it may be difficult for you to make sure that you expand your abdomen. To find out if you are doing this exercise properly, place a book on your abdomen. You will see the book rises as you inhale and then slowly descends as you exhale.
THE IMPORTANCE OF BREATHING
Because of its deep purifying effects on the respiratory system, exercising the breath when practicing yoga helps you to manage respiratory ailments like asthma and bronchitis by removing mucus.
Breathing exercises help you achieve a calm and alert mind. Throughout time we become aware of the process of breathing and discover the capacity that our lungs have. To increase your overall health and to prevent and cure respiratory illnesses, it's best to practice complete yoga sessions at least two times per week. These exercises or poses can be practiced at any time, although it's best to do them in the morning before starting your day.
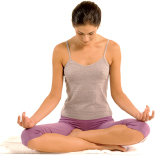
Basic breathing techniques
Practicing breathing is a fundamental element in yoga. From the start, it's important to concentrate on the differences in your body when you are tense or relaxed, and when you are resting or using your body. There is a strong relationship between your emotional state and your breathing. Practicing yoga helps you to become conscious of the respiratory process. Over time and with effort, you will learn to improve your physical and mental health through breathing. Taking deep breaths, for example, changes your mental and physical state and makes you feel better. This is what is called “complete breathing” consisting of three types of breathing: abdominal, thoracic and clavicular.
∎ Abdominal or diaphragmatic breathing
This is the easiest breathing technique. Lie down on the floor and rest both hands on your abdomen.
Take a deep breath, inhaling slowly through your nose, expanding the abdomen voluntarily, concentrating your energy in that spot. Hold your breath for a few seconds. Then slowly exhale, contracting your abdomen.

∎ Thoracic breathing
In the same position, place your hands over the middle parts of the lungs and concentrate on the energy in this area. Without moving your abdomen, take a deep breath and note how your ribs rise and your chest expands as the air enters. Next, slowly exhale, thinking about how your thoracic box closes.
∎ Clavicular or collarbone breathing
Using the same position, place your hands on your chest or on the collarbone. Inhale and exhale through the nose, paying attention to how it feels when the air lifts your ribs, collarbone and shoulders. (The body does not take in sufficient oxygen with this type of breathing, so it's best not to practice this exercise for very long.)
COMPLETE BREATHING
Complete breathing is a combination of clavicular breathing, thoracic breathing and abdominal breathing. The exercise involves the entire respiratory system to increase your lungs capacity and to relax your body and mind. First, inhale and expand your abdomen, then your thorax and finally your upper chest. Exhale in the same order, first contracting your abdomen, then your thorax and finally your upper chest.
THE PRANAYAMA
Yoga is the belief and practice which aims to extend the breathing process to absorb and distribute the vital life energy (also known as prana).
The Pranayama is a technique used to regulate the process of breathing. This technique is based on the yogi philosophy or study of the relationship between body and mind. It is recommended that you begin practicing Pranayama at least 6 months after initiating the asana exercises.
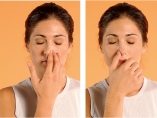
The Alternate nostril breathing
(Nadi shodhana pranayama)
Helps to normalize the breathing cycle and can be done in any comfortable asana pose. The technique is done by alternately breathing through each of the nostrils. Begin by closing one nostril with your fingers and breathing 10 rounds. Breathe 10 rounds on each side. Over time you can slowly increase the rhythm. However, never force your breath.
The Cleansing breath
(Kapalabhati pranayama)
Kapalabhati is a breathing technique used specifically for cleansing. It's a good exercise for smokers to use to detoxify the lungs. In the Lotus position or sitting with your legs crossed, begin by taking 10 quick breaths, and when you exhale pull in your abdomen (it's normal that when the air is expelled through the nose it makes more sound than you're accustomed to).
Complete three sets of 10 breaths, although a Kapalabhati session can be more complete. When you end a set, inhale deeply and exhale fully. Next, with your lungs filled with air, lower the head to close your airway, tensing your buttocks and forming a mudra with your hands. Stay in this position as long as you comfortably can, but without straining yourself. Lastly, before exhaling, bring your head facing forward, release your buttocks and move out of the position.
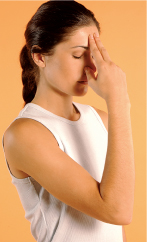
NASAGRA MUDRA
(Nasagra)
This breathing technique can improve nasal breathing. Place the tips of your index and middle fingers on your forehead. Your thumb should be on your right side and your pinkie and ring fingers on your left side. Start by breathing, alternating nostrils, by closing the nostril one side at a time. The contact of your fingers on your forehead stimulates your ajna chakra, better known as the “third eye” that is believed to bring greater mental insight, self-control, clairvoyance, superior intuition and extrasensorial perception.
INITIAL EFFECTS
Soon after beginning the practice of yoga, the body begins to feel the benefits, especially when you make an effort toward introspection and become aware of the life-giving effects. The most profound benefits are:
- • the union between the body and spirit.
- • a clearer mind and increased concentration, that will allow your spirit to take control over the material body.
- • stamina in the breath, which will rejuvenate the body.
THE SUN SALUTATION OR SURYA NAMASKAR
This is a graceful sequence of twelve yoga positions performed as one continuous exercise. This exercise is good for the respiratory system and beneficial for other parts of the body.
The Sun Salutation limbers up the whole body in preparation for the yoga asana postures because it uses the spinal column, arms and legs. If practiced daily this pose will increase your body's stamina and blood circulation, while balancing the respiratory, digestive and nervous systems. It improves the flexibility of your spine and joints and trims your waist. It also helps to prevent back pains and improves the body's posture.
GENTLE EXERCISE
Yoga is a discipline designed to improve your flexibility and harmony. The exercises use gentle movements without straining your body. When practicing the asanas remember not to strain yourself. There is no need to push yourself too far. Throughout time and willpower, you will improve your body's health naturally and get in tune with your body.
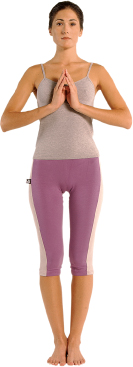
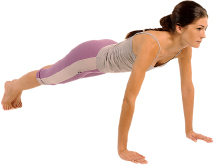
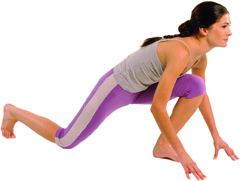
1. To begin the Surya namaskar or Sun Salutation (which is considered one of the most complete yoga exercises) stand on your feet, with your back straight, ankles together and buttocks tight. Bring your hands to the chest with the palms together, take a deep breath and hold your breath in for a moment. Next, exhale.
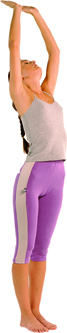
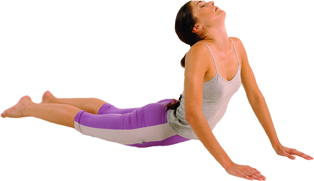
2. Lift your arms above your head and while you are taking a deep breath, separate the elbows, open your hands and arch your back, with your head back. Exhale.
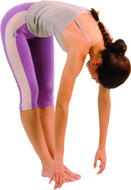
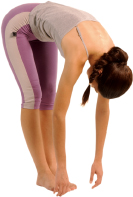
3. Bend your body forward without bending the knees. Relax your neck and touch the floor with your hands.
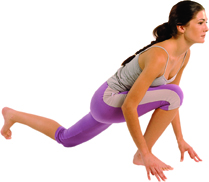
4. In a squatting position, take in a deep breath and extend your left leg back, bending your right knee into your chest. Exhale, with your arms to the sides of your body.
5. With your hands on the floor, extend your right leg backward also and put the weight of your legs on your toes, with your ankles together and your arms stretched out.
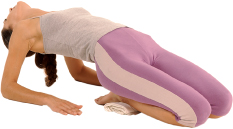
6. Exhale and bend your arms so that your torso touches the ground, keeping your hips elevated for a few seconds. Your body's weight should be distributed between your chin, chest and knees.
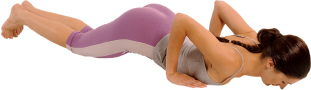
7. Inhale and lean on the lower part of your body, while you lift up your chest and shoulders and bend your head backward, with your eyes closed.
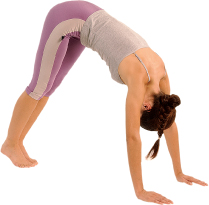
8. Placing on the palms of your hands and the soles of your feet on the ground, lift your hips up and make a bridge, with your legs straight and your head relaxed (the Tent position).
9. Repeat step 4, this time with your right leg back and your left knee bent into the chest.
10. Repeat step 3 (torso lowered, head relaxed, legs straight and touching the floor with your hands). Stay in this position for a few seconds.
11. Inhale, lift up your body and repeat step 2 (head backward, back arched and arms extended upward).

FINAL POSITION
Return to the first position, with your back straight and your hands with palms together on your chest. The philosophy of yoga considers that this hand position means peace between body, mind, spirit and Universe.
The poses
Yoga poses or asanas aim to strengthen and balance the body. Some asanas are especially good for harmonizing and facilitating proper breathing, preventing lung and bronchial disorders and relieving the symptoms of respiratory illnesses.
YOGA FOR ASTHMA
The practice of yoga can be a powerful therapy for asthma. Asthma is defined as a chronic lung condition characterized by difficulty in breathing, wheezing, coughing and tightness of the chest caused by the inflammation of the air passages or bronchoconstriction (tightening or spasm of the muscles that encircle the air passages). Yoga exercises, including the poses, yoga breathing and relaxation techniques also put you in control of your mind and emotions, make you more relaxed and make your breathing easier. This will also help to support the functioning of your lungs, and help asthma patients by enhancing airflow during asthma attacks.
The Fish
The Fish yoga pose can help complications related to asthma and bronchitial ailments, because it exercises and expands the chest muscles. Also it tones the back and abdominal muscles.
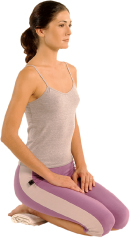
1. Sit with your back straight and your buttocks resting on your heels. Place your hands, palms down, on your thighs.
2. Breathing freely, bring your head all the way back, arching your back and leaning your elbows and hands on the floor.
3. Drop your head back so that the top of your head is on the floor, but your weight should rest on your elbows. Exhale. Bring your hands to your chest, with the palms together, stay in this position as long as you can. Next, inhale and place your elbows on the floor, bring your chin to your chest. Come out of the pose by rolling onto your side.

BRANCHES OF YOGA
There are different types of yoga, although they all have the same objective.
- • Hatha yoga: is the path of physical yoga and is the most popular branch of yoga. It uses physical poses or asanasor, breathing techniques (or pranayamas ), energy flows (bandas) and psychic gestures (mudras).
- • Raja yoga: is the path of yoga that focuses on meditation and contemplation.
- • Karma yoga: believes that your present situation is based on your past actions. The pillars are good words, good thoughts and good deeds.
- • Jnana yoga: is the path of yoga that deals with wisdom and knowledge or the yoga of the mind.
- • Bhaki yoga: is the path of heart and devotion, to see the Divine in everyone and everything he or she encounters.
YOGA AND MEDICINE
Over the past years, Western medicine has begun to accept the medical benefits of this thousand year old technique and has adopted yoga and the general lifestyle change involved in it. Unlike Western medicine, which is largely based on a science of disease and treatment, yoga is a science of health. The teachings of yoga are based on an intricate and precise understanding of the healthy functioning of the human body and mind. Its techniques are designed to maximize your own potential for good health, vitality and lasting youthfulness.
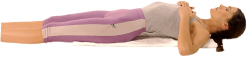
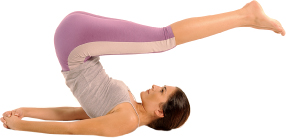
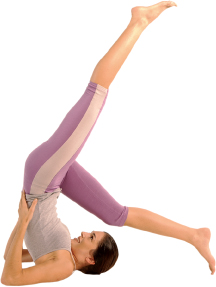
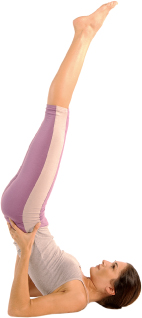
The Candle
This pose is helpful in accompanying the treatment of asthma and bronchitis. It also improves blood circulation and helps to prevent varicose veins.
1. Lying down, inhale, extend your arms next to your body, and lift your legs until they form a 90 degree angle. Exhale and when you inhale again lift up your hips and back, bringing your legs over your head.
2. Bend your arms, keep your hands on your back and bring your feet to the floor. Raise your left leg, stretched (your chin needs to be pressed against your chest, so that your neck doesn't tense up).
3. Bring your right leg up, with your toes pointed to the ceiling and remain as long as you can in this position. Next, slowly lower your torso, bending your legs and placing each segment of your backbone against the floor.
GOOD NEWS
As an example of the importance yoga has gained in the medical field, this exercise is being used as a treatment in carpal tunnel syndrome. Carpal tunnel syndrome occurs when the median nerve, which runs from the forearm into the hand, becomes pressed or squeezed at the wrist, causing pain. This condition is associated with those who work on a keyboard or repetitive activities that strain the wrist. Surgical treatment can be used, but not on all patients.
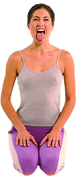
THE LION'S ROAR
- • This is a very particular asana because it is centered around a muscle that is seldom used in traditional exercises: the tongue. This pose not only stretches the tongue, it also helps to relieve sore throats and to prevent tonsillitis and pharyngitis.
- • Sit with your buttocks on your heels, back straight and hands on your thighs. Inhale and relax your jaw, stick out your tongue and exhale through the nose. Each time you exhale, stick out your tongue more as if you were trying to touch your chin with it.
Comment about this article, ask questions, or add new information about this topic: