
Yoga for a healthy back
For thousands of years, this Asian technique has been used as a way to balance and maintain the health of the spine. Yoga offers simple and effective techniques to tone the back muscles and to increase their flexibility.
TO AVOID INJURIES
When you are doing yoga positions on the floor, it's best to use a padded exercise mat or a thick blanket to avoid direct contact between the floor and your back.
SAFETY
It is not recommended to do yoga if you are suffering from intense pains.
+ When the entire spinal column is flexible, it is a sign of health and youth. With our on-the-go society and sedentary tendencies, few people enjoy the benefits of a healthy back. Yoga is a technique dating back thousands of years, its philosophical principles are based on creating harmony between body and spirit. Many yoga exercises use movements that include the entire back, stretching the spine entirely, bringing health and well-being to your back and entire body. Hatha yoga, the path of physical yoga is the most popular branch of this system in the West and focuses on physical poses or asanas. Most of these work the back muscles, helping to prevent lordosis, kyphosis and scoliosis. Yoga may be an effective relief for pain caused by a herniated disk or degenerative disk disorders. However, you should always consult your doctor before practicing yoga. If chronic back pain is caused by tense muscles, the stretches and movements used during asanas may provide a quick relief for symptoms.
GETTING READY
To warm up your body, many yoga masters recommend beginning with a series of movements called the Rocking chair or Hammock, which are ideal for releasing tension before moving on to other yoga poses.
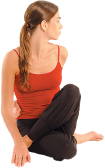
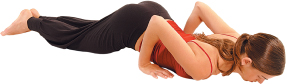
Rocking chair
This pose is used as a series of movements practiced at the beginning of a yoga session. The asana rocks the body, while at the same time increasing your muscle flexibility, releasing tension, energizing and improving the flow of energy in the spinal cord.
1. Sit on the floor, with your chin pressed against your chest. Bend your legs, with your feet pressed against the floor. Place your hands behind your knees, with your thumbs pointed outward. Keep your chin pressed to your chest to prevent back injuries.
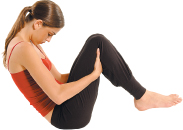
2. Lift up your feet, supporting them with your arms and begin to rock back your body.
3. Rock back and forth five or six times, keeping the legs bent to get the body ready. Inhale and take advantage of the rocking motion to stretch out your legs behind your head. If you can, try to touch the floor with the tips of your toes. Exhale and rock forward, without lifting up your chin. Repeat seven or eight times without stopping. This pose is good for loosening and toning your muscles. Next, lie back down for a minute or two to relax your body.
GENTLE EXERCISE
Yoga is a discipline designed to improve your flexibility and harmony. The exercises use gentle movements without straining your body. When practicing the asanas remember not to strain yourself. There is no need to push yourself too far. Remember to use gentle movements and don't push your body into a pose. Through time and willpower, you will improve your body's health naturally and get in tune with your body. It is important to remember to use your body with moderation, patience and consistency to prevent side effects like sore muscles or tiredness.
KEY TIPS
- • Wait for at least half an hour after meals and before practicing yoga. Try and eat a light snack an hour and a half before exercising. Or eat a moderate meal three hours before yoga.
- • After practicing asanas you shouldn't shower immediately. It's best to wait at least half an hour.
BENEFICIAL ASANAS
After the Rocking chair, which is meant to stretch out your body, the following asanas are some of the best exercises to prevent back ailments or to relieve back pains.
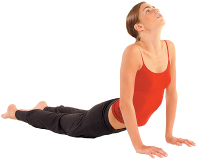
Cobra pose
The spine receives a powerful backward stretch, the surrounding musculature is strengthened and the abdominal organs are toned up and massaged.
∎ Half cobra
This pose is recommended for those who can't reach the full cobra pose. It can also be used to help you prepare for the full cobra.
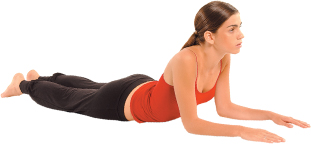
Lie face down, with the legs extended and together behind you. The tops of your feet should be stretched and resting on the floor. With your forehead still on the floor, place the palms of your hands and forearms parallel to your shoulders and head, and lift your trunk from the floor, only up to your navel, with your face looking straight forward. Stay in this position breathing naturally for a few seconds, then return to the beginning and rest.
∎ Cobra
1. Lie down with your legs together and your forehead rested on your hands on the floor. Your legs should be straight with the front of your feet resting on the floor. Use your buttocks to help you move into the next position.
2. Move your hands down to your sides, placing your palms either side of your rib cage and lift your shoulders and sternon from the ground, using your arms for support. Keep your head back, stretching your throat out. Exhale, and return to the initial position.
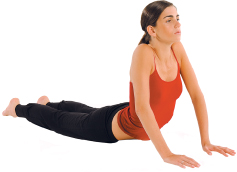
3. Inhaling, come up as before, but this time use your hands to push the whole of your trunk up. Continue up until you are bending from the middle of the spine. Hold for two or three deep breaths, then exhale and come slowly down. Inhaling, raise the trunk as before, but this time continue up and back until you can feel your back bending all the way down from the neck to the base of the spine. Breathe normally. Hold the position for as long as you feel comfortable, then slowly come down and relax.
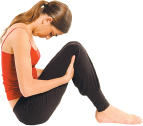
Half spinal twist
The movement stretches the spine, tones the spinal nerves and ligaments, and prevents neck and lower back pain. It also helps to remove tension in the waist; because it lengthens the lower back muscles and tones the ligaments.

1. Kneel down with your legs together, resting on your heels. Place the palms of your hands on your thighs. Your back should be straight, your chin and forehead relaxed.
2. Keep your hands in the same place and your shoulders relaxed. Then sit to the right of your feet, as illustrated.

3. Lift your left leg over your right, placing the foot against the outside of the right knee. Bring your right heel in close to your buttocks. Keep the spine erect. Stretch your left arm behind your back, twisting your waist to the left (the palm should be faced outward) and wrap your right hand over your left foot.
4. Look over your left shoulder and twist your shoulders and chest toward the left, without lifting your left foot from the ground. Then come back to the beginning position and repeat on the other side.
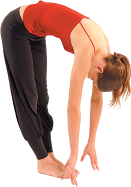
Seated forward bend
Helps the sciatic nerves, prevents lower back trouble. Increases the spine's flexibility and stimulates blood circulation in the back.
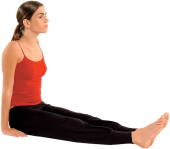
1. Sit with your feet together, toes pointing at the ceiling. Stretch out the legs and release any tension. Keep your back straight with your arms to your sides. Your hands should be pressed to the floor. Your chest and legs should form a right angle.
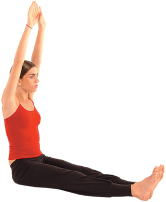
2. Take in a deep breath through your nose and stretch your arms above your head, lengthening the spine without arching your back.
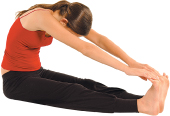
3. While you exhale lead with your chest and keeping your back straight, bring your torso forward. Continue right down and hold on to whichever part of your legs or feet you can comfortably reach without bending the knees. Breathe naturally and try to bend forward as you exhale. The correct posture should be with your forehead touching your knees. With practice, you can wrap your index fingers around your big toes and bring your elbows down to the floor, or stretch your arms out over your feet, as shown. To release, inhale while you straighten your torso, keeping your arms stretched out over your head. Next, exhale and slowly lower your arms to the side of your body.
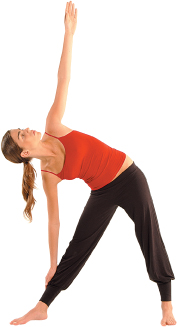
Triangle pose
This standing pose helps to straighten your spinal column and tone the spinal nerves.
1. Stand with your feet well apart (about 3-4 feet). Your feet should be parallel and your arms stretched out at shoulder level. Stand firm and keep your knees slightly bent. Stretch the torso upward while you inhale. Point your right foot outward.

2. As you exhale, bend to the right and slightly forward to bypass your ribs. Your left arm should be stretched out above the head. Slide your right hand down your right leg and hold on to the lowest part you can reach. Look out at your left hand. Take several full breaths in this position before releasing it. Repeat, bending to the left.
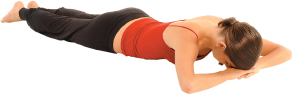
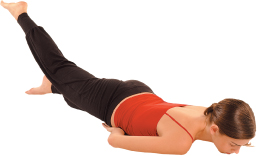
Half lobster
Increases flexibility in your back, prevents pain in the sciatic nerves and firms your abdominal muscles.
Lie on your belly, with your chin pressed to the floor. Place your forearms under your pelvis, palms faced down below your thighs. Your legs should stay straight, the top of your feet touching the floor. Inhale and lift up your right leg as high as you can without bending your knee. Stay in this position holding your breath for a moment. Exhale and slowly lower your leg. Repeat on the other side.
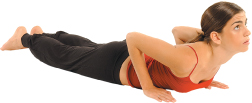
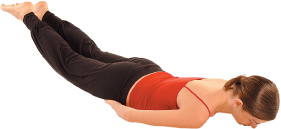
Lobster
Works the back muscles fully to strengthen the lumbar spine and the abdominal muscles.
Lie on your belly, with your chin pressed to the floor. Place your forearms and hands under your pelvis. Inhale and lift up both legs at the same time. Hold your breath. To do this pose correctly, keep your buttocks tight and use your arms for strength. Stay in this pose for a few seconds, with your chin against the floor. Then release.
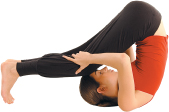
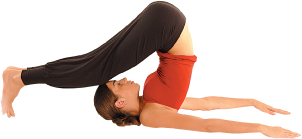
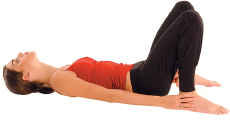
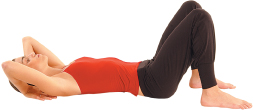
The Plow
This pose helps to keep your back lose, to avoid spinal tension, and stretches the sciatic nerve. This pose may also help to combat obesity because it works the thyroid glands.
1. Begin the position lying on your back, with your legs together, arms down by your sides next to your body and palms of your hands pressed to the floor. Bring your chin toward your chest and press your back muscles to the floor. Inhale through your nose and exhale while you lift up both legs, until they are at a 90 degree angle with your torso. Exhale, then inhale and bring your hips off the floor, supporting your back with your hands.
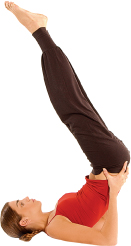
2. Without bending your knees, stretch out your legs by bringing them behind your head, until your toes touch the floor. Your arms should stay forward, with the palms of your hands pressed to the floor. Stay in this position breathing slowly and deeply. Next, inhale through your nose and slowly lower your legs while you exhale. Concentrate on how each segment of your spine presses against the floor as you bring your back down.
The Fish
This pose strengthens the neck, expands the chest muscles and tones the back and abdominal muscles.
1. Sit on your heels, with your back straight, looking forward and your hands on your thighs.
2. Breathing freely, bring your head all the way back, arching your back. Rest your weight on your elbows and palms of your hands.
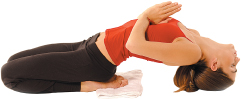
3. Drop your head back so that the top of your head is on the floor. You should feel how your vertebrae press together and the area around your throat opens. When you are firmly placed in this position, bring your hands to your chest and place the palms of your hands together. Stay in this position for as long as you find comfortable. To come out of the pose, place your elbows on the floor, inhale, bring your chin to your chest and turn your whole body to the right while you exhale.
The Cow face pose
This pose helps to maintain correct posture, increases your back's flexibility and strengthens your shoulder blades.
1. Kneel down with your legs together, resting on your heels. Keep your back straight, shoulders relaxed and look forward. Stretch your left arm with the palm of your hand facing to the right. Bend your arm backward and place the palm of your hand on your back. Bring your other arm behind your back.
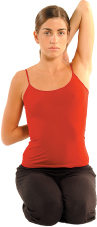
2. Wrap your hands around one another, making sure not to arch your back. Close your eyes and breathe deeply. Stay in this position for as long as you feel comfortable. Release from this position. Repeat with your other arm. (If your hands can't reach each other, you can use a towel, cord or ribbon to help you in this pose. Through time and practice you might not need any assistance.)

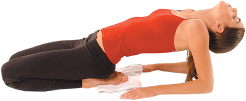
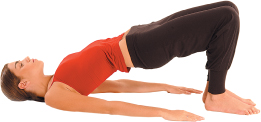
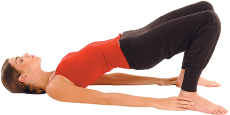
The Bridge
This is an asana for the lower back region, it stretches the spinal column and relieves tensions where we most often store them: in the back.
1. In a lying position, with your arms extended next to your body and your knees bent, feet together, keeping the balls of your feet pressed against the floor and as close to the buttocks as possible.
2. Tighten your buttocks and inhale while keeping your feet pressed to the floor; exhale while you lift up your hips, while keeping your knees pressed together and lifting your bellybutton as high as you can. Stay in this position inhaling and exhaling three times. Each time you exhale try to lift your bellybutton higher. Exhale and lower your body.
TIP FOR WOMEN
- • While you have your menstrual period and during pregnancy, you should avoid yoga poses that put you in a reverse position or those that require a lot of abdominal strength.
- • When first beginnig yoga the time that men and women can stay in an asana is similar, however progressing over time, women should increase their stamina more slowly and gently than men.
- • It's best to practice yoga without makeup, perfumes or lotions applied.
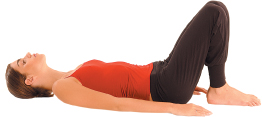
Half wheel pose
This lying pose stretches your neck and back.
1. Lie on your back with your knees bent so that your calves touch your thighs. Your arms should stay at the sides of your body; your hands wrapped around your ankles.
2. Bring your chin to your chest and lift up your buttocks without moving your hands. Concentrate on your belly button and try to lift it up more with each out breath. Close your buttocks to avoid straining your back. Stay in this position for a few minutes, and release, slowly lowering your body.
COUNTER-POSE
After completing these postures, it's recommended to do a counter-pose called the Little bear, to massage the lower and mid back. Lying down, bring your knees to your chest and hug them pressing them down on your body.
The Wheel
Strengthens the back and stretches the neck and the spine.
IMPORTANT
We've put together a guide of yoga poses that might help to keep your back healthy, however, there are safety guidelines that you should keep in mind:
- • The Lobster shouldn't be used if you have displaced or herniated disks.
- • The Cobra presents side effects for those who suffer from herniated disks.
- • Patients who are suffering from serious back trouble shouldn't practice the Plow.
- • If you feel pain in your lower back during the Bridge pose you should do the pose with your legs separated and raise the pelvis as high as you can comfortably.
- • The Head-to-knee pose should be practiced with care and stay in the pose only if you feel comfortable.
- • The Fish pose shouldn't be practiced if you have spinal ailments, dizziness, scoliosis, lordosis or lower back pain.
1. Lie on your back with your knees bent and slightly separated. Your feet should be firmly on the ground. Bend your arms back, with the palms of your hands on the ground right above the shoulders.
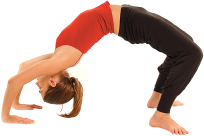
2. Bring your chest forward, arching your back as much as you can: flex your buttock and leg muscles to help you. The idea is to distribute the weight of the body so that it's not solely on the arms. Your head should fall back with your neck relaxed. Stay in this position as long as you feel comfortable. Release by bringing your trunk toward the floor, with your chin pressed to the chest and rolling onto your right side to come up.
Head-to-knee
Stretches the back and helps combat lower back pain.
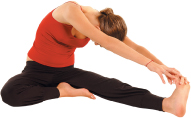
• Sit with your legs wide apart and your toes pointed to the ceiling. Bend your right leg so that the bottom of your foot rests against your inner right thigh. Inhale and lift your arms above your head. Next, exhale stretching your right leg, trying to wrap your hand around your foot. If you can't reach, take hold of your ankle or shin. Lower each time you exhale. Stay in this position as long as you feel comfortable and release. Repeat on the other side.
The Camel
Tones the back muscles, especially in the lower back region.

Sit on your ankles. Your back should be straight; your hands on your thighs; you should be looking forward; your jaw relaxed. Lift your body (using your thighs and hips) and slowly bend backward. Place the palms of your hands on the bottom of your feet. You should let your head fall back and lift up your chest forward. Stretch your hips forward as far as you can. Stay in this position, breathing freely and each time you exhale stretching your back a little more, while flexing your buttocks. Release, exhale and relax.
COUNTER-POSE
After practicing the Camel pose, sit on your heels and bring your chest down to your thighs.
It's important to relax your shoulders; your arms should stay at the sides of your body.
Your head should also drop: the weight will stretch out your spine.
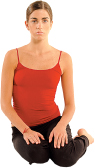
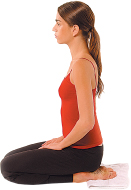
MEDITATION CAN ALSO HELP
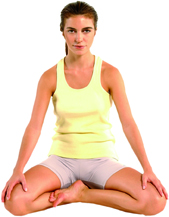
This practice helps you relax and release the tension that can cause back pain. This exercise helps eliminate negative thoughts and calms the mind to build a connection with the here and now. It's best to meditate in the Lotus pose, but because for most beginners the Lotus pose may be difficult we've included the Siddhasana, which is a simpler pose.
• Sit on the floor, with your legs in the form of a V and your hands placed on your knees. Bend your right leg, placing the ball of your foot against your left inner thigh. Next, bend your left leg and place the heel near your pubic bone.
• Close your eyes and pay attention to physical sensation, passing throughout the body and spinal column, from the feet to the crown of the head. Inhale and exhale deeply.
It's best to stay in this pose for ten minutes and allow your thoughts to pass by without becoming involved in them. In this position, your arms only have one reason: your physical senses meet at the palm of your hands. The practice of meditation aims to reverse the use of our senses, not to use them as we normally do. The objective is to eliminate external and internal interference and to tap into our vast sources of pure energy. At the same time, while taking deep breaths internal sounds or mantras (“om...” is the best known) are practiced. The mantra creates a vibration, which impedes the flow of thoughts until they stand still. It�s similar to controlling all interruptions in your mind. These are all techniques, which allow us to connect with the energy of the Universe.
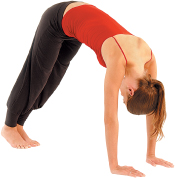
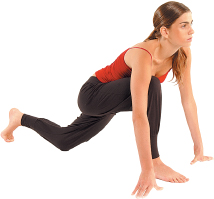
THE SUN SALUTATION
This is one of the most complete exercises in yoga. The Sun Salutation limbers up the whole body in preparation for the yoga asana postures because it uses the spinal column, arms and legs. It helps to prevent backaches, strengthens the sciatic nerves and helps to correct your posture.
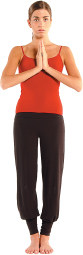
1. To begin the Surya Namaskar or Sun Salutation (which is considered one of the most complete yoga exercises) stand on your feet, with your back straight, ankles together and buttocks tight. Bring your hands to your chest with the palms together, take in a deep breath and hold it in for a moment. This gesture has a profound meaning: inner peace (the thumbs together, resting on the body) and peace with the Universe (finger pointed to the sky). Your head and back should stay in line. Inhale and hold in your breath for a moment. Next, exhale.

2. Lift your arms above your head and while you are taking a deep breath, separate the elbows, open your hands and arch your spine, with your head back. Exhale.

3. Bend your body forward without bending the knees. Relax your neck and touch the floor, your ankles or shins with your hands.
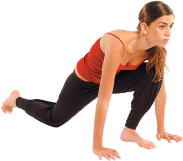
4. In a squatting position, take in a deep breath and extend your left leg back, bending your right knee into your chest. Your right foot should be firmly pressed to the floor. Your hands remain on the floor, below your shoulders to keep your balance.
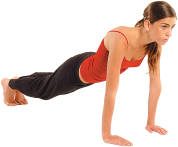
5. With your hands on the floor, extend your right leg backward, putting the weight of your legs on your toes, with your ankles together and your arms stretched.
6. Exhale and bend your arms so that your torso touches the ground, keeping your hips elevated for a few seconds. Your body's weight should be distributed to your chin, chest and knees.
7. Inhale and lean on the lower part of your body, while you lift up your chest and shoulders and bend your head backward.
8. Leaning on the palms of your hands, with your feet on the ground, lift your hips up, with your legs extended and your head and neck relaxed.
9. Repeat step 4, this time with your right leg back and your left knee bent into the chest.
10. Repeat step 3: torso lowered, head and neck relaxed, legs extended and hands touching the floor. Stay in this position for a few seconds.
11. Inhale, lift up your body and repeat step 2: head backward, back arched and arms extended upward.

12. Return to the first position, with your back straight and your hands with palms together on your chest. The philosophy of yoga considers that this hand position means peace between body, mind, spirit and Universe.

Comment about this article, ask questions, or add new information about this topic: